Sending Simple Data to Antares

In this project you will be directed to send simple data from the NB-LYNX-7000 board to the Antares IoT Platform using a series of AT Commands from the SIM7000 module.

Prerequisites

The materials required follow the General Prerequisites on the previous page. If you have not prepared the requirements on that page, then you can visit the following page.
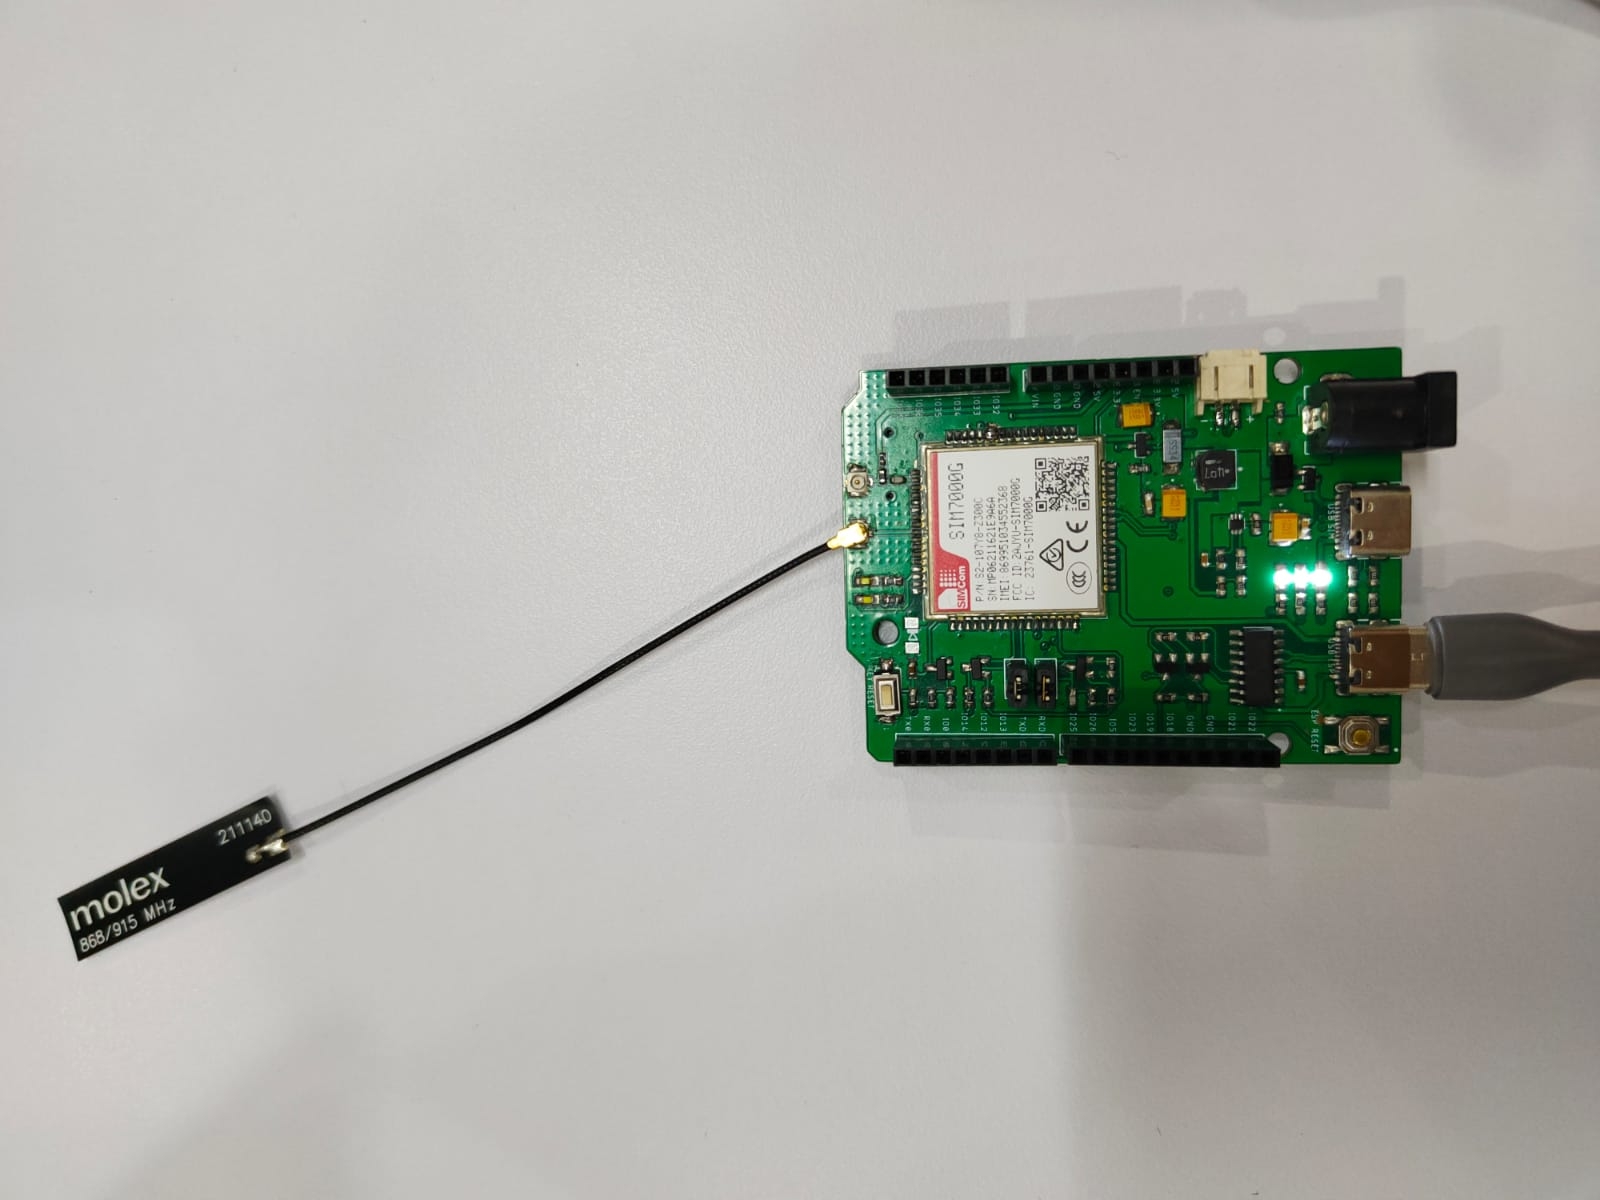
pageGeneral Prerequisites NB-Lynx-7000

Follow These Steps

1. Equipment Setup

The first thing you need to do is to setup the equipment by connecting the NB-LYNX-7000 board to your laptop/computer device using a USB-C cable.

Make sure you have installed the antenna on the GSM antenna port before connecting the NB-LYNX-7000 board to your laptop/computer.

Here are the equipment circuits that have been connected to the laptop/computer.

2. Launch the Arduino IDE application

3. Inputting programme code

To send data to Antares, you need to input the programme code below in the Arduino IDE.

#include <Arduino.h>

// Configurable macros
#define APN "nb1internet"
#define APPNAME "YOUR-APP-NAME"
#define DEVNAME "YOUR-DEVICE-NAME"
#define ACCESSKEY "0000000000000000:0000000000000000"
#define PAYLOAD "{\\\"t\\\":\\\"25.5\\\",\\\"h\\\":\\\"60.35\\\"}"
#define SIM7000_POWER_KEY 25

const uint32_t interval = 10000; // 10 s interval to send message
uint32_t previousMillis = 0;  // will store last time message sent
uint32_t counter = 0;      // message counter

String sendCommand(String command, uint32_t timeout, char delimiter)
{
 while (Serial2.available())
  Serial2.read();

 uint32_t T = millis();
 String res = "";
 Serial.print("[SYS CMD] ");
 Serial.print(command);
 Serial.println("=========");
 Serial2.print(command);
 while ((millis() - T) < timeout)
 {
  while (Serial2.available())
  {
   res = Serial2.readStringUntil(delimiter);
   res.trim();
   if (res.length() > 0)
   {
    Serial.print("[SYS RES] ");
    Serial.println(res);
    return res;
   }
  }
 }
 return "TIMEOUT";
}

String receiveAddCommand(int32_t timeout)
{
 String res = "";
 uint32_t T = millis();
 while ((millis() - T) < timeout)
 {
  while (Serial2.available())
  {
   res = Serial2.readStringUntil('\0');
   res.trim();
   if (res.length() > 0)
   {
    Serial.print("[SYS RES] ");
    Serial.println(res);
    return res;
   }
  }
 }
 return res;
}

bool checkResponse(String response, String expected_response)
{
 if (response.indexOf(expected_response) != -1)
  return true;
 else
  return false;
}

bool sim7000_L1()
{
 pinMode(SIM7000_POWER_KEY, OUTPUT);
 delay(100);
 digitalWrite(SIM7000_POWER_KEY, HIGH);
 delay(1000);
 digitalWrite(SIM7000_POWER_KEY, LOW);
 delay(5000);
 for (uint8_t i = 0; i < 5; i++)
 {
  if (checkResponse(sendCommand("AT\r\n", 200, '\0'), "OK"))
  {
   sendCommand("ATE0\r\n", 200, '\n');
   return true;
  }

  delay(1000);
 }
 return false;
}

bool sim7000_L2()
{
 if (!checkResponse(sendCommand("AT+CNMP=38\r\n", 200, '\n'), "OK"))
  return false;
 if (!checkResponse(sendCommand("AT+CMNB=2\r\n", 200, '\n'), "OK"))
  return false;

 return true;
}

bool sim7000_L3(uint8_t stage)
{
 switch (stage)
 {
 case 0:
  if (!checkResponse(sendCommand("AT+CIPSHUT\r\n", 300 * 200, '\n'), "SHUT OK"))
   return false;

 case 1:
  if (!checkResponse(sendCommand("AT+CSTT=\"" + String(APN) + "\"\r\n", 200, '\n'), "OK"))
   return false;

 case 2:
  if (!checkResponse(sendCommand("AT+CIICR\r\n", 300 * 200, '\n'), "OK"))
   return false;

 default:
  if (checkResponse(sendCommand("AT+CIFSR\r\n", 200, '\n'), "ERROR"))
   return false;
 }

 return true;
}

bool sim7000_L3_check()
{
 String response = sendCommand("AT+CIPSTATUS\r\n", 200, '\0');
 if (checkResponse(response, "OK"))
 {
  if (checkResponse(response, "PDP DEACT") || checkResponse(response, "TCP CLOSED"))
   return sim7000_L3(0);
  else if (checkResponse(response, "IP INITIAL"))
   return sim7000_L3(1);
  else if (checkResponse(response, "IP START"))
   return sim7000_L3(2);
  else if (checkResponse(response, "IP GPRSACT"))
   return sim7000_L3(3);
  else
   return sim7000_L3(0);
 }
 else
  return sim7000_L3(0);
}

void sim7000_send()
{
 String httpBody = "{\"m2m:cin\": {\"con\": \"%1\"}}";
 httpBody.replace("%1", PAYLOAD);

 String response = sendCommand("AT+CIPSTART=\"TCP\",\"platform.antares.id\",\"8080\"\r\n", 200, '\n');
 if (checkResponse(response, "OK"))
 {
  if (!checkResponse(response, "CONNECT OK") && !checkResponse(response, "ALREADY CONNECT"))
  {
   response = receiveAddCommand(300 * 200);
   Serial.print("Response : ");
   Serial.println(response);
  }

  if (checkResponse(response, "CONNECT OK") || checkResponse(response, "ALREADY CONNECT"))
  {
   Serial.print("POST /~/antares-cse/antares-id/" + String(APPNAME) + "/" + String(DEVNAME) + " HTTP/1.1\r\n");
   Serial.print("Host: platform.antares.id:8080\r\n");
   Serial.print("Accept: application/json\r\n");
   Serial.print("Content-Type: application/json;ty=4\r\n");
   Serial.print("X-M2M-Origin: " + String(ACCESSKEY) + "\r\n");
   Serial.print("Content-Length: " + String(httpBody.length()) + "\r\n\r\n");
   Serial.println(httpBody);

   sendCommand("AT+CIPSEND\r\n", 200, '\0');
   Serial2.print("POST /~/antares-cse/antares-id/" + String(APPNAME) + "/" + String(DEVNAME) + " HTTP/1.1\r\n");
   Serial2.print("Host: platform.antares.id:8080\r\n");
   Serial2.print("Accept: application/json\r\n");
   Serial2.print("Content-Type: application/json;ty=4\r\n");
   Serial2.print("X-M2M-Origin: " + String(ACCESSKEY) + "\r\n");
   Serial2.print("Content-Length: " + String(httpBody.length()) + "\r\n\r\n");
   Serial2.print(httpBody);
   Serial2.write(0x1A);

   String response2 = receiveAddCommand(300 * 200);
   Serial.print("Response2 : ");
   Serial.println(response2);
  }

  sendCommand("AT+CIPCLOSE\r\n", 200, '\n');
 }
}

bool nbSetup()
{
 Serial2.begin(9600);
 Serial.println("[SIM7000] Turning ON...");
 if (sim7000_L1())
  Serial.println("Success");
 else
 {
  Serial.println("Failed");
  return false;
 }

 Serial.println("[SIM7000] Set NB Mode... ");
 if (sim7000_L2())
  Serial.println("Success");
 else
 {
  Serial.println("Failed");
  return false;
 }

 Serial.println("[SIM7000] Start IP Connection...");
 sim7000_L3(0);

 return true;
}

void setup()
{
 Serial.begin(115200);
 if (!nbSetup())
 {
  while (1)
   delay(1000);
 }
}

void loop() {
 // Check interval overflow
 if (millis() - previousMillis > interval) {
  previousMillis = millis();

  if (sim7000_L3_check()) {
   char message[50];
   sprintf(message, "Sending frame : %d", counter);
   Serial.println(message);
   sim7000_send();
   counter++;
  }
 }

 // Add a stopping condition here
 if (counter >= 10) { // Stop after sending 10 messages
  Serial.println("Program stopped.");
  while (1) { // Enter an infinite loop to stop further execution
   delay(1000);
  }
 }
}

Don't forget to replace APPNAME with the name of the application you created on the Antares platform, DEVNAME with the name of the device created on the Antares platform, and ACCESSKEY with your account access-key.

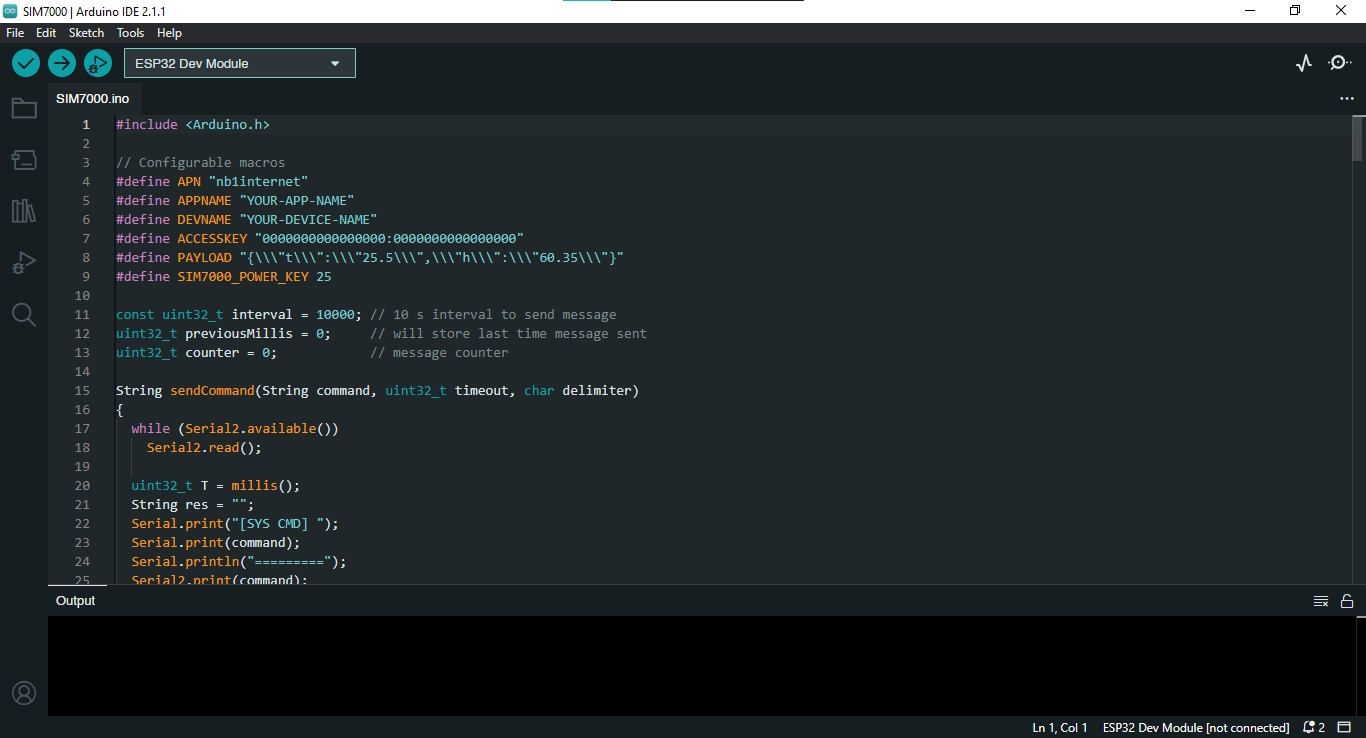
After inputting the programme code, don't forget to save the programme code by selecting File > Save As. Here is how the Arduino IDE looks when you have inputted the code.

4. Programme Code Explanation

In order for the NB-LYNX-7000 board to communicate with the Antares platform, a SIM7000 module is used. SIM7000 is a cellular communication module developed by SIMCom Wireless Solutions. This module implements several protocols that allow the device to connect to the network using AT commands. The following describes some of the AT commands used in the programme code.

AT<CR><LF>

In the program code, the command "AT\r\n" is sent as the starting point or initialisation stage of the SIM7000 module. \r is a carriage return, while \n is a line feed. This command is sent to get an "OK" response.

ATE0<CR><LF>

In the programme code there is an "ATE0\r\n" command sent after getting an "OK" response. This command is used to disable echo mode indicating that initialisation has been successful.

AT+CNMP=<mode><CR><LF>

In the programme code, the command "AT+CNMP=38\r\n" is sent to select the desired mode. The parameter "38" is set so that the SM7000 module only works on LTE networks, which are commonly used for NB-IoT.

Berikut parameter <mode> lain yang dapat digunakan

  • 2 = Automatic

  • 13 = GSM only

  • 38 = LTE only

  • 51 = GSM and LTE only

AT+CMNB=<mode><CR><LF>

The programme code contains the command "AT+CMNB=2\r\n" which is used to select the mode between CAT-M and NB-IoT. The parameter "2" is used to select NB-IoT.

Here are the other parameters available

  • 1 = CAT-M

  • 2 = NB-IoT

  • 3 = CAT-M dan NB-IoT

AT+CIPSHUT<CR><LF>

In the programme code there is a command "AT+CIPSHUT\r\n" which is sent as case 0 to turn off the PDP (packet data protocol) context. PDP context is a protocol in mobile communication that is used to manage data sessions between the device and the network. The "AT+CIPSHUT\r\n" command is used to ensure that all active internet connections have been turned off before continuing with other configurations. The response that will be received when sending this command is "SHUT OK".

AT+CSTT=<apn>CR><LF>

In the programme code there is a command "AT+CSTT=""+ String(APN) + ""\r\n" which is sent as case 1 to set the APN (Access Point Name) on the SM7000 module as a GPRS (General Packet Radio Service) connection. String(APN) is used to convert the variable defined at the beginning of the code using #define APN "nb1internet" into a string. Therefore, the APN set in this case will have the value "nb1internet".

AT+CIICR<CR><LF>

In the programme code there is a command "AT+CIICR\r\n" which is sent as case 2 to activate the wireless connection in the form of an IP connection. This IP connection is used as data transmission.

AT+CIFSR<CR><LF>

In the programme code there is a command "AT+CIFSR\r\n" which is sent as the default case to get the IP address when the previous cases (case 0, case 1, and case 2) have no match. This command is used to ensure that the IP address is successfully obtained which is indicated by a response in the form of an IP address. If this process fails, the response received is ERROR.

AT+CIPSTATUS<CR><LF>

The programme code contains the command "AT+CIPSTATUS\r\n" which is used to query the current connection status.

AT+CIPSTART=<mode>,<domain name>,<port><CR><LF>

In the programme code there is a command "AT+CIPSTART="TCP", "platform.antares.id", "8080"\r\n" which is used to start a TCP connection on a host and port. In this case the host used is platform.antares.id with port 8080. You can also replace the host name with the IP address.

AT+CIPSEND<CR><LF>

The programme code contains the command "AT+CIPSEND\r\n" which indicates that the SIM7000 module is ready to send data through the established TCP connection.

5. Program Upload to NB-LYNX-7000 Board

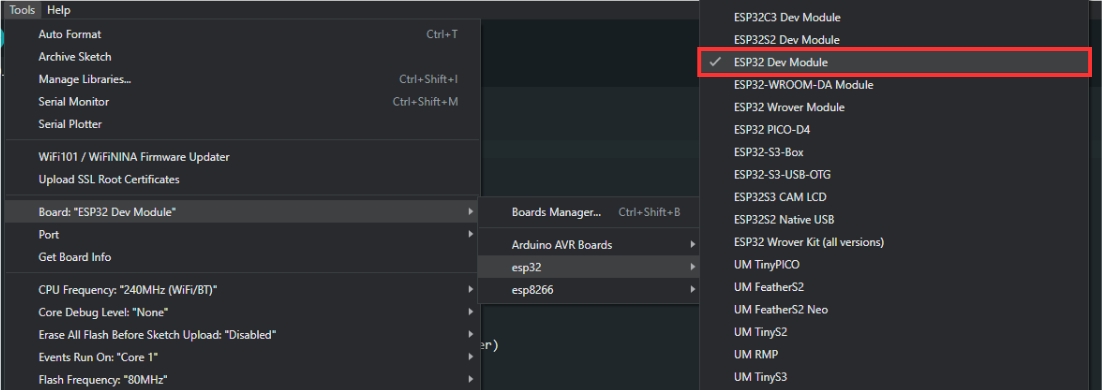
You must set up the board being used by selecting ESP32 Dev Module under Tools > Board > esp32.

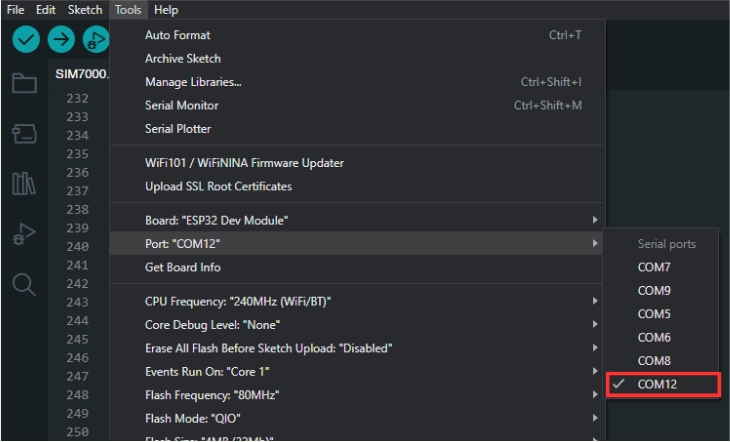
After that, you need to set the port used by going to Tools > Port > COM(X). The X value corresponds to the port number used by the NB-LYNX-7000 board.

After you have prepared the programme code, you can then upload the programme code by pressing the upload button as shown in the image below.

If the programme code has been uploaded successfully, you can open the Serial Monitor by pressing the icon as shown in the image below. You can find the icon on the top right-hand side.

You need to set the Serial Monitor's baud rate to 115200 so that its output can be read.

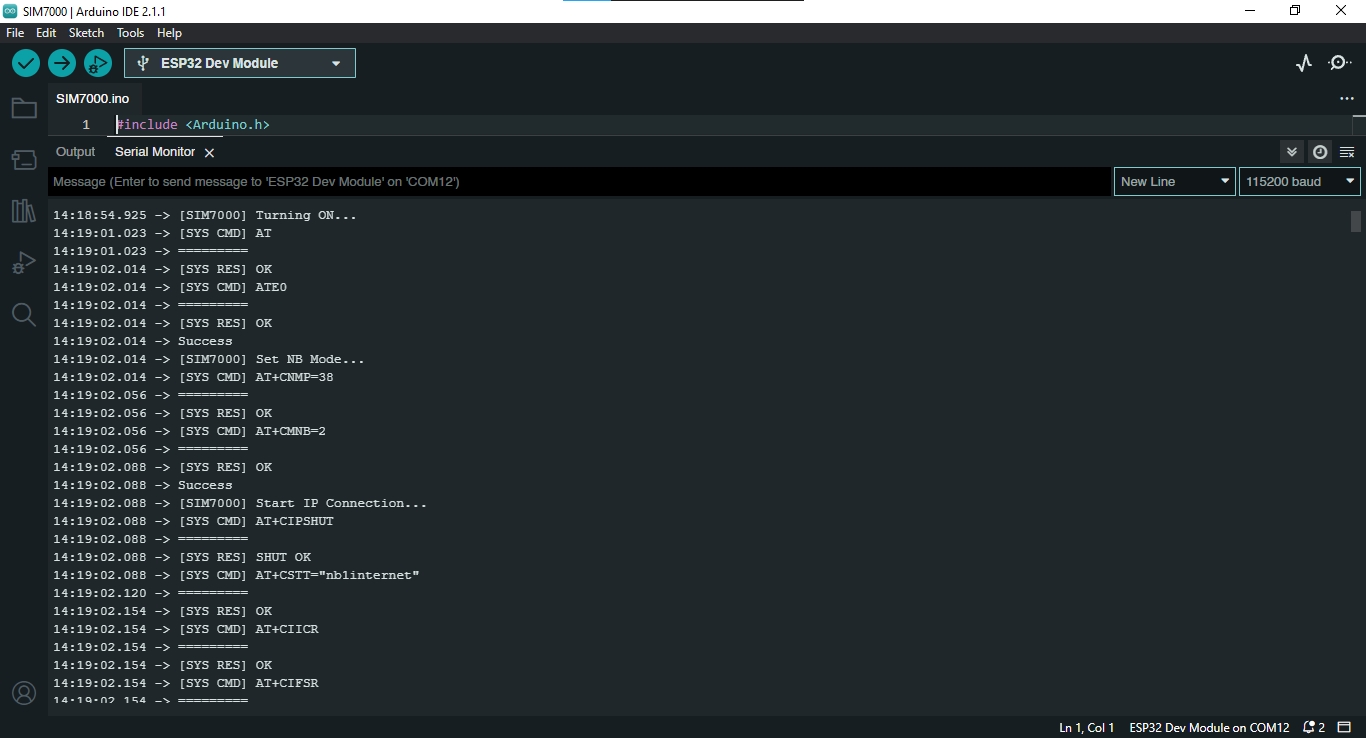
The Serial Monitor display will be as shown below, signalling the initiation of the SIM7000 module.

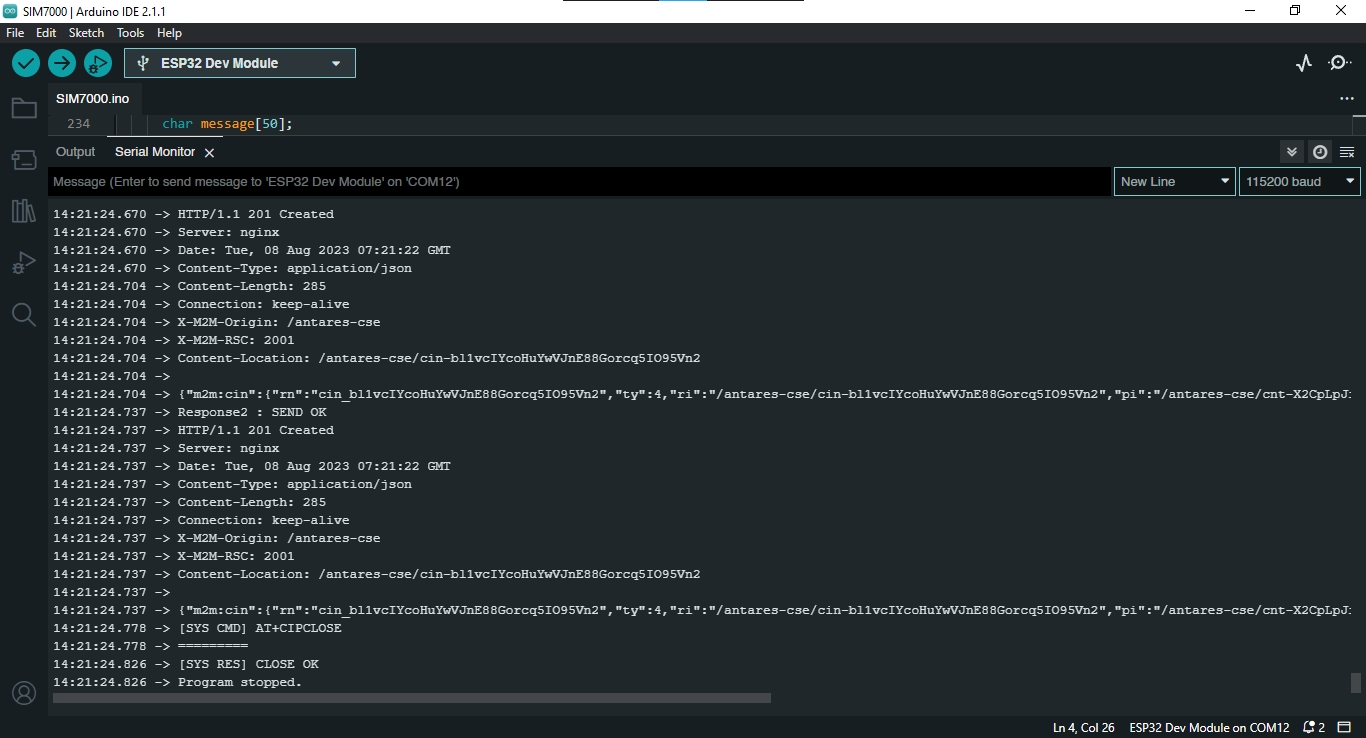
After successfully sending data 10 times, the programme will stop as shown in the following figure.

6. Check Data on Antares IoT Platform

To ensure that the data has been sent correctly from the NB-LYNX-7000 board to the Antares IoT Platform, you can open your device URL. The following image shows the display on the Antares IoT Platform that has received data from the NB-LYNX-7000.

Last updated