Coding Stuff

A. Data stored in Antares

B. Get the latest data from your device via Android

1. AndroidManifest.xml

In order to execute the Antares API, we need Internet access and in order to access the Internet on Android, we need to add the following lines to AndroidManifest.xml.

<!--- IMPORTANT!!!!!!! --->
<!--- Tambahkan line berikut di AndroidManifest.xml Anda --->
<!--- Setelah manifest --->
<uses-permission android:name="android.permission.INTERNET" />
<!--- Sebelum application --->

2. activity_main.xml

Modify ALL the contents of activity_main.xml with the following content:

<?xml version="1.0" encoding="utf-8"?>
<android.widget.LinearLayout xmlns:android="http://schemas.android.com/apk/res/android"
    xmlns:tools="http://schemas.android.com/tools"
    android:layout_width="match_parent"
    android:layout_height="match_parent"
    tools:context=".MainActivity"
    android:orientation="vertical">

    <TextView
        android:id="@+id/txtData"
        android:layout_width="wrap_content"
        android:layout_height="wrap_content"
        android:text="No Data"
        android:textSize="24sp"/>

    <Button
        android:id="@+id/btnRefresh"
        android:layout_width="wrap_content"
        android:layout_height="wrap_content"
        android:text="Refresh"/>

    <Button
        android:id="@+id/btnOn"
        android:layout_width="wrap_content"
        android:layout_height="wrap_content"
        android:text="On"/>


    <Button
        android:id="@+id/btnOff"
        android:layout_width="wrap_content"
        android:layout_height="wrap_content"
        android:text="Off"/>

</android.widget.LinearLayout>

3. MainActivity.java

// !!!!------ IMPORTANT ---------!!!!//
// Ubah semua code setelah package nama.package.Anda dengan
// dengan Code berikut

import android.os.Bundle;
import android.util.Log;
import android.view.View;
import android.widget.Button;
import android.widget.TextView;

import org.json.JSONException;
import org.json.JSONObject;

import androidx.appcompat.app.AppCompatActivity;

import id.co.telkom.iot.AntaresHTTPAPI;
import id.co.telkom.iot.AntaresResponse;

public class MainActivity extends AppCompatActivity implements AntaresHTTPAPI.OnResponseListener{

    private Button btnRefresh;
    private Button btnOn;
    private Button btnOff;

    private TextView txtData;
    private String TAG = "ANTARES-API";
    private AntaresHTTPAPI antaresAPIHTTP;
    private String dataDevice;
    @Override
    protected void onCreate(Bundle savedInstanceState) {
        super.onCreate(savedInstanceState);
        setContentView(R.layout.activity_main);

        // --- Inisialisasi UI yang digunakan di aplikasi --- //
        btnRefresh = (Button) findViewById(R.id.btnRefresh);
        btnOff = (Button) findViewById(R.id.btnOff);
        btnOn = (Button) findViewById(R.id.btnOn);

        txtData = (TextView) findViewById(R.id.txtData);

        // --- Inisialisasi API Antares --- //
        //antaresAPIHTTP = AntaresHTTPAPI.getInstance();
        antaresAPIHTTP = new AntaresHTTPAPI();
        antaresAPIHTTP.addListener(this);

        btnRefresh.setOnClickListener(new View.OnClickListener() {
            @Override
            public void onClick(View v) {
                antaresAPIHTTP.getLatestDataofDevice("your-access-key","your-application-name","your-device-name");

            }
        });

        btnOn.setOnClickListener(new View.OnClickListener() {
            @Override
            public void onClick(View v) {
                antaresAPIHTTP.storeDataofDevice(1,"your-access-key", "your-application-name", "your-device-name", "{\\\"status\\\":\\\"1\\\"}");

            }
        });

        btnOff.setOnClickListener(new View.OnClickListener() {
            @Override
            public void onClick(View v) {
                antaresAPIHTTP.storeDataofDevice(1,"your-access-key", "your-application-name", "your-device-name", "{\\\"status\\\":\\\"0\\\"}");
            }
        });
    }

    @Override
    public void onResponse(AntaresResponse antaresResponse) {
        // --- Cetak hasil yang didapat dari ANTARES ke System Log --- //
        //Log.d(TAG,antaresResponse.toString());
        Log.d(TAG,Integer.toString(antaresResponse.getRequestCode()));
        if(antaresResponse.getRequestCode()==0){
            try {
                JSONObject body = new JSONObject(antaresResponse.getBody());
                dataDevice = body.getJSONObject("m2m:cin").getString("con");
                runOnUiThread(new Runnable() {
                    @Override
                    public void run() {
                        txtData.setText(dataDevice);
                    }
                });
                Log.d(TAG,dataDevice);
            } catch (JSONException e) {
                e.printStackTrace();
            }
        }
    }
}

4. Logcat Result

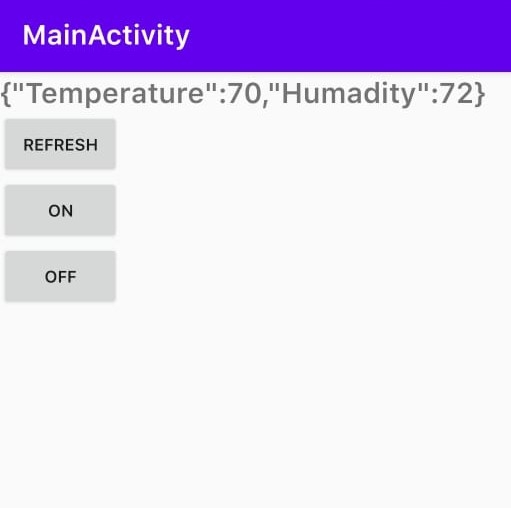
We can filter the output log results on Android. Please fill in the section as shown below. When the button is clicked, the output results can also be seen in the image below.

Congratulations! You have created your first Android APP using the Antares Library.
C. Connecting a Smartphone to Android Studio

1.Set Settings on Smartphone

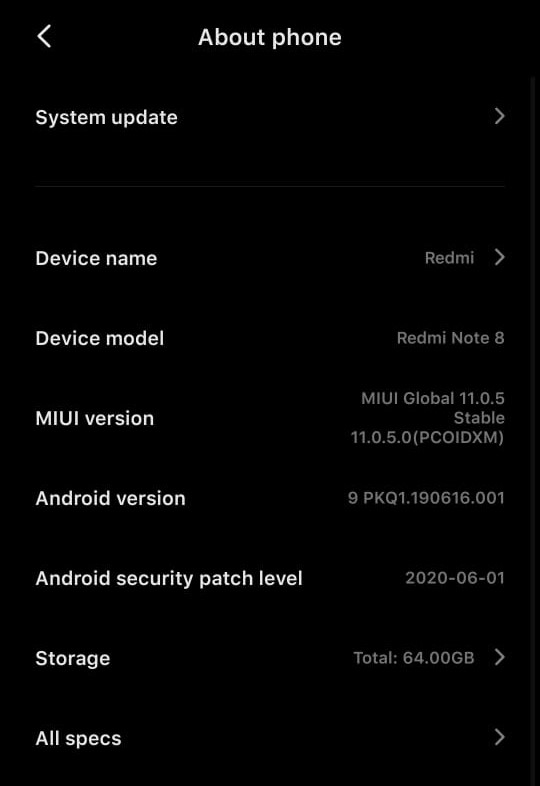
  1. Enter the "Settings" menu on your smartphone, then click AboutPhone. Triple click on the MIUI Version / Version Number section of your smartphone until "you are developer" appears.
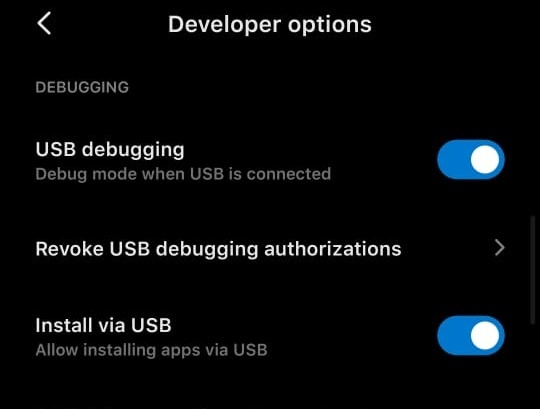
  2. Enter the "Developer Options" menu in Settings and activate USB Debugging.
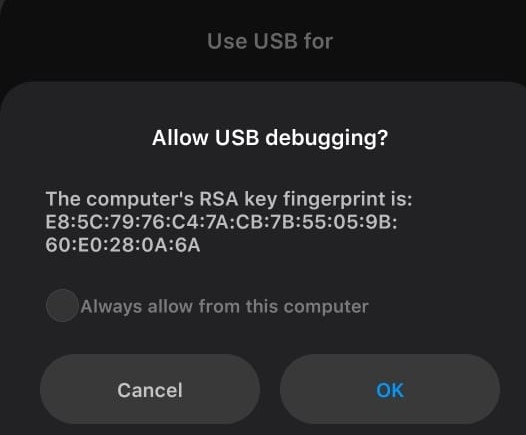
  3. Connect your Smartphone USB with Laptop / PC, if there is a notification like this then click OK and your Smartphone is connected to Android Studio.
Last updated